C# – Odd or Even?

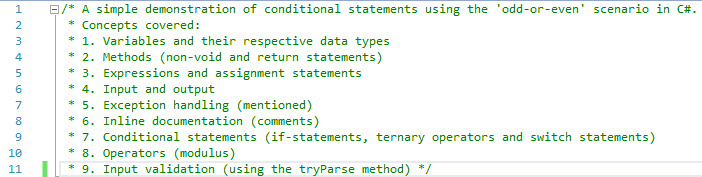
/* A simple demonstration of conditional statements using the 'odd-or-even' scenario in C#.
 * Concepts covered:
 * 1. Variables and their respective data types
 * 2. Methods (non-void and return statements)
 * 3. Expressions and assignment statements
 * 4. Input and output
 * 5. Exception handling (mentioned)
 * 6. Inline documentation (comments)
 * 7. Conditional statements (if-statements, ternary operators and switch statements)
 * 8. Operators (modulus)
 * 9. Input validation (using the tryParse method) */

//Library equipped with all the required features, do not omit!
using System;

namespace OddOrEven
{
    class Program
    {
        /* This function will simply return a value of 0 or 1,
         * this is done by retrieving the input and calculating the rest of the division. */
        static int modulus_check(int value)
        {
            //Modulus returns the remainder.
            return value % 2;
            //Any line of code beyond the return statement is ignored.
        }
        static void Main(string[] args)
        {
            /* variable value of type integer,
             * this will be used to convert the input (initially string) to integer
             * when using the tryParse method as this accepts two parameters.
             * You would first need to pass the string variable,
             * followed by out [REPLACE WITH INTEGER VARIABLE]. */
            int value;

            /* Prompt user to enter the number.
             * Make sure you do not enter a decimal number.
             * (may yield undesirable results if not handled correctly,
             * hence why tryParse will be used.) */
            Console.Write("Enter an integer: ");

            //The input will first be treated as string.
            string input = Console.ReadLine();

            /* What will happen at this point:
             * 1. String input is converted to integer.
             * 2. It will then check that the input matches the correct format.
             * (i.e: it will raise an 'exception' if it detects textual/decimal input)
             * 
             * This is an alternative to the try-catch method, and is said to be slightly quicker.
             * In this case, the try-catch would have looked something similar to this...
             * 
             * try 
             * {
             *      ...
             * }
             * catch(FormatException [ANYTHING OF YOUR CHOICE, NO KEYWORDS]) 
             * {
             *      Console.WriteLine([exception_name].Message);
             *      //Use the variable by itself for a more detailed error message.
             * }
             */
            if(int.TryParse(input, out value))
            {
                /* Invoke the user-defined function.
                 * Make sure that you add the Console.Write()
                 * otherwise the result will not be displayed. */
                Console.Write(modulus_check(value));

                /* We can check whether or not the value is odd or even in three ways: 
                 * 1) if-statement
                 * 2) switch statement
                 * 3) ternary operators */

                //Example 1: Switch statement

                //Do not include the '== 0'.
                switch(value % 2)
                {
                    //The case are the conditions.

                    //In case the value is 0.
                    case 0:
                        Console.WriteLine(": This is an even number.");
                        break;
                    //In case the value is 1.
                    case 1:
                        Console.WriteLine(": This is an odd number.");
                        break;
                    //Display an error message if a different value is produced.
                    default:
                        Console.WriteLine(": Value can only be 0 (even) or 1 (odd).");
                        break;
                }

                //Leave a blank line.
                Console.WriteLine();

                //Example 2: if-statement

                //If the modulo calculation returns 0...
                if(value % 2 == 0) { Console.WriteLine(": This is an even number."); }
                //If the modulo calculation returns 1...
                else { Console.WriteLine(": This is an odd number."); }

                //Leave a blank line.
                Console.WriteLine();

                //Example 3 (last but not least): ternary operator

                //var accepts all sorts of data, use this if you are not sure of what data type to use.

                /* The expression is stored in the variable 'result' of type var.
                 * If modulo calculator evaluates to 0, print first statement.
                 * Else print the second statement. */
                var result = (value % 2 == 0) ? ": This is an even number." : ": This is an odd number.";
                Console.WriteLine(result);

                /* Value can only be 0 or 1.
                 * 0 = even/1 = odd
                 * Value is returned to main method from modulus_check. */
            }
            else
            {
                //String/decimal input is not allowed!
                Console.WriteLine("Textual input not allowed!");
            }

            //Used so the console does not close after debugging, press Enter to exit.
            Console.ReadLine();
        }
    }
}

Our fellow beginners may find the above code intimidating but fear not, this solution will be broken down bit by bit. I added inline-documentation (comments) so you can skim through the code easily and fathom the solution’s purpose.

Comments in C# can be added in two ways: // for a single-line comment and /* [ENTER COMMENT HERE] */ for multi-line comments. Moreover, you can also comment out code you may not need to execute for the time-being by pressing CTRL-K-C (and CTRL-K-U to un-comment), this is less time-consuming as there is no need to re-type the eliminate code should you ever need to refer to it.

Lines 25 and 27 contain a single line-comment.
Multi-line comments spanning across eleven lines.

Comments help break down a program as they annotate the purpose and functions of the code, these are not only helpful for the programmer but also for others who wish to review the solution. To put it simply, comments are not mandatory but are definitely recommended. There is no need to go overboard with them, of course.

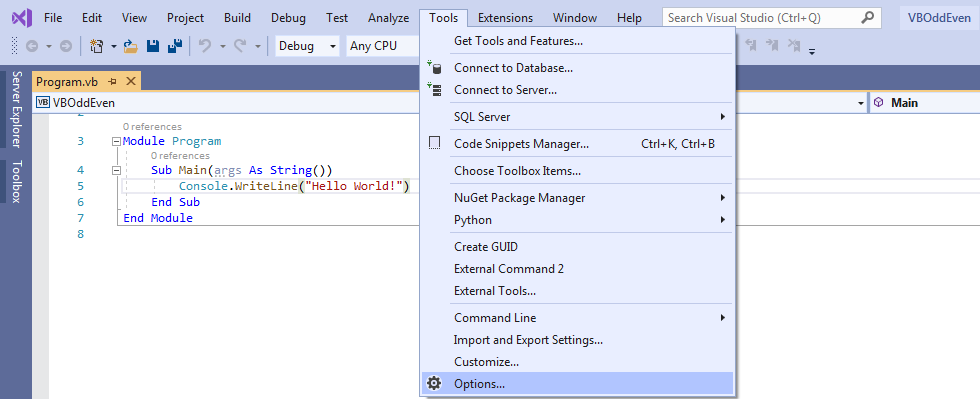
Inline documentation in Visual Studio is usually highlighted in green. If you are not afraid of tinkering with the IDE (Integrated Development Environment; Integrated Development Environment is to Integrated Drive Electronics as Java is to JavaScript, I digress. The Integrated Development Environment is a software application, allowing programmers to develop their own software, equipped with build automation tools, compilers and/or interpreters, debugger and source code editing functionalities), you can actually customize the source code editor.

I am using Visual Studio 2019, this should be the same for previous versions.
Navigate to Fonts and Colors within the Environment section.
Change the foreground/background colour to whatever you deem fit. Click OK, changes should take effect immediately (applicable only to the solution being used).
Do not omit the System namespace, you will not be able to access the Console class.

View full list here: https://docs.microsoft.com/en-us/dotnet/api/system?view=netframework-4.8

In this scenario, there are two methods (the modulus_check and the Main). The Main is the method which is first executed, and where other methods can be invoked (called). The modulus_check method simply calculates returns the remainder using the modulo 2 based on the input which is subsequently passed as a parameter to the modulus_check method from the Main method as shown below.

In Line 35, we simply declare an integer variable. Since this variable will store a value input by the user, we needn’t initialize said variable. The difference between declaring and initializing a variable is that declaration is when one specifies a data type (this post assumes you may be familiar with data types, if not more will be discussed about data types later on) and an identifier (name, label, you name it…) for a variable, whereas initialization is when you also assign a value to a variable (assignment statement).

We’ll cross this bridge when we get to it, don’t worry….
A demonstration of an integer variable being declared and initialized in separate lines.

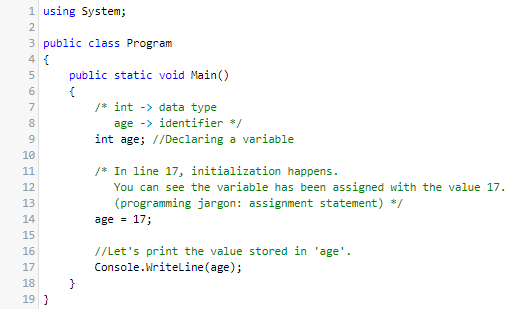
Below you will see how you can declare and initialize a variable in a single line, also known as direct initialization.

An identifier refers to the name you give to a variable. You can name your variable anything you please as long as you comply with the naming conventions.

  1. Variables must never start with a number or special characters.
  2. Keywords (the programming language syntax) must never be used as an identifier unless they are prefixed with a @.
  3. Spaces are not allowed, instead use the underscore to delimit words.

View the full list of keywords here: https://docs.microsoft.com/en-us/dotnet/csharp/language-reference/keywords/

Links to learning more about coding standards and naming conventions:

https://www.c-sharpcorner.com/UploadFile/8a67c0/C-Sharp-coding-standards-and-naming-conventions/

https://github.com/ktaranov/naming-convention/blob/master/C%23%20Coding%20Standards%20and%20Naming%20Conventions.md

Anyways, back to the focal point…

The Write method resides in the Console class.

Line 41 consists of a print statement, here the user will be asked to enter a whole number. Note that I used the Write instead of WriteLine. Write allows subsequent outputs to be displayed in a single line, whereas WriteLine allows subsequent outputs to be displayed in a new line.

Since we will be using int.TryParse(), I will first allow the input to be considered as string. Said method will be used to convert the input from string to integer, it will subsequently validate the input.
This demonstrates how the value in variable input (string) is written to variable value (integer). Basically, if textual input is detected, raise an error. Else, invoke the modulus_check method and take it from there.

Here we are saying that if the input matches the correct format, we carry on with the modulus calculation and display the necessary result. Else, raise an error and display an error message to the user.

Alternatively, we could have used the try-catch blocks. try encapsulates code which may be erroneous, whilst the catch encapsulates code which handles these errors rather than letting the application crash, hence exception handling. Although not mentioned, the finally encapsulates code which runs irregardless of the outcome.

Decision making (conditional statements in programming terms) has never been easier in C#. We will be attempting the following:

  • switch statements
  • if-else statements (we have already used this for input validation)
  • ternary operators

Switch statement

You will only need to pass the expression. The cases are the conditions. If the outcome is 0, it is an even number. If the outcome is 1, it is an odd number. The default indicates a value beyond the acceptable ranges (in this case, this will only transpire as a result of an incorrect calculation), if that’s the case, simply display an error message. Note that break indicates that only the code within the case based on the given value will be executed.

if-else statement

If the value amounts to 0, the value is an even number. Else, it is an odd number. Note that you can only get 0 or 1, otherwise you might be dealing with a logic error as a result of an incorrect calculation.
Inline documentation says it all…
Console.ReadLine(); stops the console from closing immediately after debugging. You can alternatively use Console.ReadKey();. The difference is that with ReadLine(), you can only press Enter. Whereas with ReadKey(), you can press any key.

Will it work?

That we shall see very shortly

Let’s run the solution and see what this baby can do!

How to be calm when the unthinkable arrives…

If you encounter this, you probably have a missing semicolon (maybe you have recently switched from Python or Visual Basic) or misspelled syntax – a syntax error. Yes, something minuscule can make a colossal difference in programming.

And for the record, it would always be best to select No.

Good luck locating and rectifying the errors! P.S: Summon the trusty Error List…. and stay calm.

No issues found!

Else, if the console pops up, congratulations! You have survived the first run!

Let’s see what happens if I enter… let’s say, 24.

Worked as expected.

What if I enter 5?

Ditto.

And a special character for good measure…

The program did not crash, that’s a good sign.

Input Process Output (IPO) Diagram

Conclusion

We have confirmed that the program is error-free (does not crash and produces the correct results).

Feel free to refer to the code, I will also be attaching a link to download the source code. Please extract before use.

RAR: https://mcastedu-my.sharepoint.com/:u:/g/personal/mandy_farrugia_c10352_mcast_edu_mt/EcKiMYpY8epKpyQzRN0w_IsBik8hLFjWuF5ivDZvMqvQBw?e=hX9JfH

ZIP: https://mcastedu-my.sharepoint.com/:u:/g/personal/mandy_farrugia_c10352_mcast_edu_mt/ESvKeHIrLwpLmv8TK6wPUk8Bj0TUiQ42CK2UW77c5STWmg?e=yZiS4g

In the case of insufficient storage space, you can use .NET Fiddle. It supports C#, F# and Visual Basic, and only requires an internet connection.

Thank you for taking some time out of your day to read this post! Stay tuned for more updates! I may be creating the Visual Basic version using Windows Forms/WPF.

Will it work?

Just last month, I had tried to install Windows Vista on the Acer Aspire 5732z, which sadly flopped as I could not for the life of me find the drivers compatible with the operating system. To add insult to injury, not even my TP-Link TL-WN823N USB wireless adapter was able to install properly, thus running DriverPack was not going to be possible without connecting via Ethernet but even that did not work.

This week I decided to replace Windows Vista with another operating system, but what? For some reason, Linux will refuse to start up and the screen starts to blink on and off (although I could keep macOS in mind for next time).

Then something clicked! I realized that I can change the BIOS to IDE (disk controllers). Yes, you probably know where I’m going with this…

Five months ago, I had tried to install Windows XP on this laptop but it would not let me get past the boot screen above after copying the files. At the time, I had tried to install it with SATA disk controllers. The CD was slip-streamed with the required drivers, the user is prompted to press F6 to install any third party drivers in the early stage of the setup.

This time I will try to install Windows XP with IDE disk controllers, thus I will not be required to install any extra drivers. The question remains whether or not it will work.

Readying the laptop for the installation process. The image above shows an untouched and pre-activated copy of Windows XP Professional Service Pack 3.
If you intend to install Windows XP with slip-streamed drivers, change/leave the SATA mode to AHCI. Else, if you prefer to install it without getting your hands dirty, change the SATA mode to IDE. Be careful when altering with this option, it may result in an inaccessible boot device, especially in the case of a dual boot system!

After leaving the BIOS, it should tell you to press any key to boot from CD/DVD or USB in order to access the setup.

At this point, you cannot do much else except waiting for the setup to load the required files. After what seems like an eternity (usually the result of old hardware), you should see ‘Setup is starting Windows’. It will then examine all available disks.

Since I decided to split my hard disk into two partitions, I will install the operating system in the D: partition. Unless you had resized the disk, you would only have one partition in a disk. I will then press Enter to proceed with formatting options.
Choose what is best for you and press Enter to proceed with the installation.
Confirm that you want to install Windows on the selected partition and allow the installation to commence. This is your last chance to back out if you are not sure of what you are doing.

No human intervention is required at this point, feel free to sit back and enjoy a cup of tea while you wait. Under no circumstances should you interrupt the setup in any way, doing so may cause irreversible damage. The computer will restart after all files are copied. Ignore any prompts to press a key to boot from the installation media.

In my case, this indicates that the installation was a swift success as I could never get past the boot screen. Whether or not the rest will work remains unknown for now.

Fairly self-explanatory. You will then be asked to configure the region and language options, as well as to provide basic information such as username and password.

Afterwards, allow the installation to finish off. It should reboot, once again please ignore any prompts to press a key to boot from the installation media.

There’s not much else you can do really.
Select whatever option you deem fit.
You shall be taken to the OOBE (out-of-box experience) shortly. Also, kindly excuse the open door in the background.
Welcome to Windows XP from Microsoft, the new version that brings your PC to life. Experience the best, experience Windows XP. (If you have sound drivers, saying that the experience would be impeccable would be an understatement)

Feel free to summon the trusty Merlin by pressing the F1 for assistance. You are allowed to change security and user account settings later on, no need to fawn over the OOBE.

Wait for it…

After three years of trying to get Windows XP to install on this laptop…

There you have it, folks! Windows XP is finally up and running (satisfactorily so) on the Acer Aspire 5732z. Maybe next time, I may try installing the macOS High Sierra.

Thank you for reading this post! Have a nice day!

Installing Windows Vista on the Acer Aspire 5732z

Why Windows Vista?

Windows Vista, the successor of Windows XP, was subject to inexorable criticism due to issues such as lack of drivers support, poor performance, and the implementation of UAC (User Account Control), a new security feature most users deemed annoying.

The development of Windows Vista, at the time known by its codename Longhorn, began five months before the release of Windows XP to the public in May 2001. It was planned that Longhorn would be released in late 2003 between Windows XP (codenamed Whistler) and Blackcomb, which would become Windows 7 in 2009.

Build 3683 of Windows Longhorn introduced significant changes, namely a new theme Plex, a refined graphical-based installed, a more aesthetically pleasing Windows Explorer, and a modified login screen which featured the current date and time on the top right corner of the screen. This build also featured virtual desktops, an aspect re-introduced later on in Windows 10. It was moreover the first ever build to feature the sidebar.

Windows Longhorn (Build 3683) was leaked in November 2002 by XBetas. The hardware requirements remained the same as those for Windows XP.

Certain builds of Longhorn were leaked to the public via file transfer/sharing software such as BitTorrent and forums. The release date was extended continuously until on August 27th 2004, it was announced changes in the development of Longhorn due to feature creep. A considerable amount of features were eliminated or postponed. In 2005, Longhorn was renamed to Vista.

Windows Aero, a visual style enabling transparency in windows and the taskbar very prominent in Windows Vista and 7, was first introduced in Build 4039. Aero was supported on selective builds of Longhorn (4039, 4066, and 4074).

Windows Aero in Windows Longhorn (build 4039). This was the very first build to feature Aero.

Windows Vista (Build 5824) was originally planned to be the released-to-manufacturing build on October 17th 2006. However, the plan was foiled due to a bug that destroyed systems upgraded from Windows XP. Development of Vista was finalized on November 8th 2006 with Build 6000. The final release for the public was rolled out on January 30th 2007.

Windows Vista (build 5824): What could have been the RTM build had it not been for a bug that could potentially ruin the system post-upgrade.

Windows Vista’s minimal hardware requirements were a far cry from those of its predecessors and most hardware at the time of Vista’s release was only compatible with said previous versions of Windows, mainly Windows XP. Certain applications and hardware getting by just fine on Windows XP would not even work on Windows Vista upon upgrading.

Prior to upgrading, users usually ran the Windows Vista Upgrade Adviser. Upon scanning the computer, the test then compiles a report containing information about software/hardware compatibility and how one could optimize their computer system to ensure a better user experience.

A comparison of the recommended hardware requirements of Windows XP and Windows Vista have been tabulated below.

Windows XP Windows Vista
1.5GB of free hard disk space15GB free hard disk space
Pentium 300MHz processor1GHz 32-bit/64-bit CPU
128MB internal memory1GB internal memory

In order to run Windows Aero in Vista, one would need a graphics processor supporting DirectX 9 and WDDM drivers.

To put it simply, the hardware at the time was beyond insufficient (stemming from a lack of drivers) to run such a resource-hungry operating system. Ironically enough, at the time of the release of Vista’s release, Microsoft stated that computer systems sold post-2005 were able to run said OS.

A plethora of users ended up downgrading to Windows XP. Back in March 2008, ChangeWave had conducted a study resulting in only 8% of corporate users satisfied with Windows Vista, compared to a percentage of 40% of corporate users satisfied with Windows XP.

Between April and May of 2009, Microsoft rolled out Service Pack 2 in an attempt to rectify the issues found in Windows Vista RTM and Service Pack 1. Service Pack 2 indeed introduced a great deal of features, however at the time, Microsoft was working its way through developing Windows 7, an improvement of Vista that took the world by storm upon its release to the public in October 2009.

Windows 7 (build 7600, RTM) rectified a vast majority of issues present in Windows Vista. Over a hundred million copies of the critically acclaimed operating system were sold worldwide. TechRadar concluded that Windows 7 offers the security features from Windows Vista and better performance than XP could provide on the hardware of the Windows 7 era.

Windows Vista’s worldwide market share has plummeted to 0.84% as of January 2017, as reported by Emil Protalinski from VentureBeat.

What’s the focal point?

Now that the influx of assignments have been submitted, thus done and dusted, I have more time for testing and blogging. A while ago, I found a copy of the 64-bit version of Windows Vista Home Basic I had bought from a local computer shop last year. I had installed the operating system on my ASRock H61M DGS-R2.0 machine for the sake of experimenting back in November.

This is a single use license, meaning that the software can be installed as many times as you want but only on one computer. Today I will try installing it on the Acer Aspire 5732z, a laptop purchased in late 2011. The laptop is fairly functional (it must be used on AC power at all times otherwise it will not even turn on as the battery is faulty) despite the signs of wear and tear, and the continuous beeping noises upon powering it on.

The Acer Aspire 5732z (released circa 2010) was purchased in late 2011 with Windows 7 Home Premium pre-installed. Given its current age, it is in fair cosmetic condition.

I will not bother installing any drivers post-installation as said laptop is not my main device (not to mention Vista’s extended support has ended two years ago, thus looking for drivers and software compatible with Windows Vista and the laptop’s hardware respectively is cumbersome), I only care whether or not a clean installation of Windows Vista on the Acer Aspire 5732z proves successful. Without further ado, let’s initiate the installation procedure.

In case of an optical disc (CD/DVD), eject the tray and insert the media. Don’t forget to close the tray! Else in the case of a USB installation media, insert the thumb drive in any available USB port. The installation media should be recognized as one of the boot devices in the BIOS.
Boot to the BIOS and set the installation device to first-boot priority, this step is of paramount importance!

Remember to save all settings when exiting the BIOS. If you have set the installation media to first boot priority, you should encounter ‘Press any key to boot from CD or DVD/USB’ after the POST self-test. The key press will initiate the setup.

Wait for the files to load, the waiting times depend on the specifications of your computer, mainly the hard drive.

These settings can be changed post-installation via Control Panel, do not fawn too much over them for now.
I would like to format and create a partition via command prompt, so I will select ‘Repair your computer’.

The above slideshow demonstrates the formatting and creation of partitions using the command prompt. After closing the System Recovery Options window, you should be taken back to the setup. Select ‘Install Now’.

Even though it is not mandatory to enter the product key at this point, it is highly recommend that you do so. Else, just select Next to skip this process.
Accept the license terms to proceed.
In the case of a clean installation, make sure you have performed a backup (on-site and off-site preferably to ensure prevention of data loss while bearing in mind that no method is ever a hundred percent foolproof) of any significant data.
Select the partition you deem fit to install Windows (you can format and delete partitions if necessary, make sure you know what you’re doing).

Wait for the operating system to be installed, this mostly depends on the speed of your hard drive. Interrupting the installation may result in irreversible damage.

Wait for the installation to finalize, the computer shall restart once again.

You will then be taken to the OOBE (out-of-box experience, not to be misconstrued as out-of-body experience) as shown in the slideshow below.

Allow Windows to check the system’s performance, you will soon be logged on to Windows.

Log in to your account.
You shall see the desktop shortly.
Here we are at last!

The installation process is rather similar on Vista’s successors.

That’s all there is to it! Thank you for reading this post, I hope this post was helpful to you. Stay tuned for more updates!

References

https://en.wikipedia.org/wiki/Windows_Vista#Development

https://en.wikipedia.org/wiki/Criticism_of_Windows_Vista

https://betawiki.net/wiki/Windows_Longhorn_build_3683

https://betawiki.net/wiki/Windows_Aero

https://betawiki.net/wiki/Windows_Longhorn_build_4039

https://betawiki.net/wiki/Windows_Vista_build_5824

https://en.wikipedia.org/wiki/Windows_Vista#Service_Pack_2

https://en.wikipedia.org/wiki/Windows_Vista#Marketing_campaign

Installing and testing out MaurenLite on Windows XP

Prior to publishing the very first version of MaurenLite, a text editor written in C#, I had set the target framework to .NET Framework 3.5 in order to implement support for Windows XP. This post will demonstrate the process of installing MaurenLite, note that this process works on the successors of Windows XP as well.

In order to proceed to the setup, you must accept the license agreement for each component.

Wait for the files to download, these are required for the installation of the .NET frameworks. Do not interrupt the download/installation process.

Allow it to restart in order for the rest of the components to be downloaded and installed successfully.
Wait until the operating system reboots, it should not take too long.

There is nothing you can do at this point except wait for the rest of the components to install. This may take some time, be patient and do not interrupt the process.

Once you click Install, the application will launch automatically.

MaurenLite is now installed! Notice how next to the Help option from the menu bar, there is a combo box with a list of programming/scripting/markup languages. Some of the options generate code when selected.

That’s all there is to it! I will be updating the application from time to time where I will be committing any necessary changes to the code and design.

MaurenLite can be downloaded via https://mcastedu-my.sharepoint.com/:u:/g/personal/mandy_farrugia_c10352_mcast_edu_mt/EciaOWqCs_9GnVpEQ6dm0ZABdyiM8vAm0m8EkU3uX4z04g?e=UakkWx

Tweepy API for Python: #2

In order to be able to use Twitter via a Python script, you must at least have access to the standard Twitter API. You will then need to provide the access tokens and consumer API key in the script so as to gain authorized access to your account. This post shows how one can easily register with Twitter Developers to use the API in Python.

Very self-explanatory as of this point, search for ‘Twitter Developers’ and select the first hit.

Editing source code via Inspect Element

You may notice that the first hit has been marked in yellow and the text is in uppercase. One can actually change a bit of source code while surfing the web thanks to the Inspect Element tool on Google Chrome!

Inspect Element allows users to access and temporarily alter HTML and CSS code in a website. This tool is especially helpful for web developers when testing out their website to see what can be changed, implemented and removed. They can see how the website would look with different styles (background colour as an example) and fix any errors present in their JavaScript code (it also warns you about any missing content referenced in the code) via the Console section as pictured below.

I had referenced a non-existent image and failed to use the correct hide/show toggle function in jQuery, thus triggering the errors above.

Let’s try it out, shall we?

Right-click the first hit and select ‘Inspect’.
Select the line of code representing said hit and edit its HTML code, this will allow us to how the element has been stylized in CSS. This section may seem rather intimidating if you lack knowledge of HTML and CSS. If you are simply interested in registering for Twitter Developers, skip this.
.L20lb is a class assigned to the <h3> element, add another property to it which will change the case of said element to uppercase. Look to the left and notice the difference.

text-transform: uppercase;
Select the <h3> element once more but this time we are going to modify its HTML code in order to highlight the heading via <mark>.
On the right, there is CSS code for the highlight element. You change it to another colour if you like by altering the background-color property. Note that both HTML and CSS does not recognize British spelling. Also remember that each statement must end with a semicolon!

background-color: yellow;

Once you’re done, simply close the Inspect Element tool. Note that the changes committed will be erased once you refresh/close the tab.

Registering for Twitter Developers

Once you have accessed the homepage, select Apply from the navigation bar on the right next to the search functionality and the avatar.
Select ‘Apply for a developer account’ to proceed.
Choose only one option applicable to you.
Give a detailed explanation as to why you wish to use the Twitter API, this may affect whether or not your application will be accepted.
Enable/disable the element according to your needs.
List the functionalities you intend to use and why.
Enable/disable the two elements according to your needs.

Verify that all the input is correct, you have the option to go back and alter the form. Otherwise, select ‘Looks good!’.

Agree to the terms and conditions and select ‘Submit Application’.
You should receive an email prompting you to confirm your email address.
Once you have confirmed your email address, select ‘Create an app’ within the Get Started section.
Since we need to gain access tokens in order to gain access to our Twitter account while running the Python script, we need to create a new application.
Enter the necessary details as instructed.
The first four text fields can be left empty. In the last text field, you have to explain how this application will work and how users can benefit from it.
Heed the above information.
These are the keys and tokens you will need to reference in your Python script. Under any circumstances must you disclose any of these! It is recommended that you regenerate them every now and then.

Now we have created the application. There is nothing left to do on Twitter Developers, we may now create a Python script and take it from there.

Evidence that the solution works

Copy the consumer API keys and access tokens, we will need to assign them to variables in Python.

I created this very short-but-sweet script that will upload a post saying “Welcome to my feed” to my Twitter page. For the sake of keeping things simple, I refrained from using the try-catch block and asking for input.

Press F5 to run, it will prompt you to save the file. Upon saving, it should run. If it works, you should see the following.

That’s all there is to it! Thank you for taking some time out of your day to read this post! I hope it helps you in one way or another.

Stay tuned for more updates!

References

https://projects.raspberrypi.org/en/projects/tweeting-babbage/5

https://zapier.com/blog/inspect-element-tutorial/

Is Windows 8 radically different than previous versions of Windows?

Windows 8, one of the most notorious versions of Windows ever developed by Microsoft apart from Vista and Millennium Edition (often shortened to ME), was released to manufacturing on August 1st 2012 and later on released to the general public on October 26th 2012. Like its predecessors, Windows 8 is a personal computer operating system and part of the Windows NT family of operating systems, some of which include Windows 7, released in 2009, and Windows XP, released in 2001.

For users who have never tried out the beta versions of Microsoft Windows 8, said operating system seems like a far cry from the previous versions of Microsoft Windows since it consists of a new interface which is a lot different than the one from its predecessor. Moreover, a new operating system platform was also introduced. The operating system was optimized for tablets rather than just desktop computers and laptops, therefore it also introduced touch screen input. At that point, it was clear that Microsoft was competing with mobile operating systems such as Android and iOS. Initially, the Metro Design was indiscernibly introduced in Encarta 95 and MSN 2.0. The traditional start screen was replaced with a Metro UI start screen, similar to that of Windows Phone 7, whereby programs are displayed on a grid of dynamic tiles. UEFI Secure Boot support for devices with UEFI firmware, as well as support for USB 3.0 and cloud computing was implemented. Pre-installed applications such as Mail, Photos, Music, Calendar among others were also incorporated in Microsoft Windows 8. It also allowed you to mount ISO image files without having to install and use any thirdparty software. The charms bar appears when moving the pointer to the right side of the screen, said functionality allows the user to access specific features. A new online store, Windows Store, was also released for downloading and purchasing of software.

One can say that Windows 8 was rather revolutionary, for it brought radical changes to the era of a dynamic technology as we know it today. But something was still missing. Can you guess? The Start Button! Amidst the development of the tablet-friendly operating system, Microsoft made the mistake of abolishing the Start button. Instead you had to move the pointer to the far left of the taskbar and a small tile will pop up displaying the Start menu or you could simply press the Start key from the keyboard. Despite the new features that were introduced in Windows 8, support for touch screen input and the improvement in performance, as well as security, a great deal of users were not all pleased due to the new user interface which they found perplexing. Users complained about said user interface being frustrating especially when used with the traditional mouse and keyboard, some even said that Windows 8 was meant for tablets rather than desktop computers or laptops. Sometimes it even impeded them from shutting down or restarting the computer or switching between applications as the aforementioned pre-installed applications were available only in full-screen mode. One could at least switch between applications by means of Alt-Tab.

Removed features include DVD playback support on Windows Media Player, as well as Windows Media Center and Backup and Support although the functionality was not completely abolished. Compared to previous versions of Microsoft Windows, the operating system came with two versions of Microsoft Internet Explorer; the Metro application and the traditional desktop application which one could find on the taskbar. Significant changes in Windows Explorer were also introduced in Windows 8. The Aero Glass Theme from Microsoft Windows Vista up to its successor, replacing Microsoft Windows XP’s visual styles, has also been axed alongside the desktop gadgets.

That aside, by January of 2013, sixty million copies of Microsoft Windows 8 were said to have been sold according to Tami Reller, Chief Financial and Chief Marketing Officer for Windows. Said figure does not include volume license sales but only “sell in to OEMs for new PCs and upgrades”. The operating system allows users to log in using either their Microsoft credentials or their local account. When signing in with a Microsoft account, the operating system was able to synchronize the user’s settings across their other devices.

Windows 8 comes with three editions, excluding Windows RT, which go as follows; Microsoft Windows 8 Core (or simply Windows 8), Windows 8 Pro (may include Windows Media Center when purchasing the Pro Pack to upgrade from the core edition using the “Add features to Windows” functionality) and Windows 8 Enterprise. The core edition was mostly pre-installed on retail computer systems.

The core edition is aimed at home users and small businesses, the Professional edition is aimed at small businesses as well, whereas the Enterprise edition is aimed at larger organizations.

All editions of Windows 8 are able to support both 32-bit and 64-bit architectures and the physical copy of the operating system comes with both architectures. The system requirements of Windows 8 do not differ that much from those of Windows 7, except that the recommended memory required for Windows 7 to run smoothly is two gigabytes and four gigabytes for Microsoft Windows 8.

The touch-screen friendly operating system suffered a similar fate as Windows Vista, released in 2007, and Windows Millennium Edition, released in 2000. By all means, Windows 8 was highly criticized for its shortcomings, namely the new user interface and the removal of the Start button and the traditional Start menu which made it frustrating for computer users to utilize the operating system. Senior editor Tom Warren of ‘The Verge’ stated that it “was awkward to use with a keyboard and mouse”. Diana Adams, the mother of OSFirstTime brainchild, Philip Adams, labelled Windows 8 as “childish” and claimed that it “is optimally run on a tablet PC” rather than a desktop computer. Adrian Kingsley-Hughes from ZDNet criticized the interface for being “clumsy and impractical” and even considered his experience with Windows 8 awful.

At the time, the only alternatives users had should they have gotten bored of Windows 8 was either to downgrade back to one of its predecessors or to switch completely to Linux or Mac OS X. Its market share plummeted more and more as time went by and due to the great deal of criticism, Microsoft launched an update in April of 2014 which would later on be known to the general public as Windows 8.1. The Start button was restored and the Start menu was modified as well. Other changes include subsequent addition and removal of features.

Windows 8 is now out of support as of Tuesday, 12th January 2016, thereby it no longer receives updates. In order to continue receiving updates and support, the user must upgrade to Windows 8.1 or Windows 10. Nowadays, Windows 8 has almost lost its market share being at around three percent. A few days after its release, Microsoft had sold four million copies of the operating system which according to CNET is rather disappointing. A month after its release to the general public, Microsoft had sold forty million copies.

To conclude, it is rather safe to say that Windows 8 is indeed radically different than its predecessors. However, in spite of all the criticism that it received, this notorious piece of technology led to the subsequent development of Windows 8.1, as well as Microsoft Windows 10 which is a more improved version of the last two operating systems and has been merging Windows 7 and Windows 8.x together for the past three years since the Technical Preview Build 9841 which was released in late 2014. To put it simply, Windows 8.1 and Windows 10, the successor of Windows 8, have corrected the oversights present in the notorious operating system. Windows 10 makes it easier for the user to switch between a number of applications compared to its predecessors. In spite of its shortcomings, the boot time for Windows 8 was a lot quicker compared to that of its predecessors and performs better in benchmarks.

What is your opinion on Windows 8? What was your experience with the operating system? Would you recommend it to your family or friends? All in all, did it deserve all those negative reviews? Feel free to give your input by means via private messaging, commenting or electronic mail.

References

Albanesius, C. (2012, May 4). Microsoft Dropping DVD Playback Support in Windows 8. Retrieved from PC Website: https://www.pcmag.com/article2/0,2817,2403983,00.asp

Foley, M. J. (2012, July 18). Windows 8’s delivery date: October 26. Retrieved from ZDNet: http://www.zdnet.com/article/windows-8s-delivery-date-october-26/

Foley, M. J. (2013, January 8). Microsoft: 60 million Windows 8 licenses sold to date. Retrieved from ZDNet: http://www.zdnet.com/article/microsoft-60-million-windows-8-licenses-sold-todate/

Massey, S. (2012, February 15). Metro UI Design Principles. Retrieved from Stephane Massey: http://www.stephanemassey.com/metro-design-principles/

Metro (design language). (n.d.). Retrieved December 18, 2017, from Wikipedia: https://en.wikipedia.org/wiki/Metro_(design_language)

Mum tries out Windows 8 (2012). (2012, November 3). OSFirstTimer.

Rouse, M. (n.d.). What is Windows 8? – Definition from WhatIs.com. Retrieved December 2017, from TechTarget: http://searchenterprisedesktop.techtarget.com/definition/Windows-8

Singh, M. (2016, January 12). Microsoft Ends Support for Windows 8 on Tuesday . Retrieved from Gadgets 360: https://gadgets.ndtv.com/laptops/news/microsoft-ends-support-for-windows8-on-tuesday-788864

Windows 8. (n.d.). Retrieved December 2017, from Wikipedia: https://en.wikipedia.org/wiki/Windows_8

Windows 8 (2012). (n.d.). Retrieved December 18, 2017, from OSFirstTimer Wiki: osfirsttimer.wikia.com/wiki/Windows_8_(2012)

Tweepy API for Python: #1

As mentioned in a previous blog, I had included the Tweepy API for my Embedded Systems coursework. This online API, provided by Twitter, allows users to use Twitter via a Python script. One would need to import the tweepy library (so as to access said API) and the access tokens, these can be acquired upon registering for Twitter for Developers. I have tested this feature on both Windows and Linux respectively, I may test it in on macOS as well.

Download Python

You will not be able to install the tweepy module if Python is not installed. Visit the link below to download the latest version of Python. Make sure you add the path at which Python is installed to environment variables within System in the Control Panel.

https://www.python.org/downloads/release/python-373/

Installing the tweepy module

Enter ‘pip install tweepy’, this will copy the contents (functions) of the module to your installation of Python. Ignore the messages in yellow. If for some reason it fails, try ‘python3 pip install tweepy’.
NOTE: There were issues with Python v. 3.7.2!
The IDLE is where the source code will be produced. There are other IDEs/text editors that you can use such as Visual Studio Code, Visual Studio (the Community version is free), Brackets and Sublime Text among others.

Getting our hands dirty with Python

The inline documentation (the statements in red which in Python are known as comments, the compiler will ignore said statements) helps demystify what may be deemed perplexing and intimidating to beginners. Comments usually explain what the code is supposed to do and why.

The invoke_error function handles run-time errors (when the program crashes amidst execution due to scenarios the program is not meant to cater for, such as division by zero, specifying invalid paths, entering textual data in fields that only accept numerical data, etc). What it does is display an error message instead of simply allowing the program to crash.

The try block contains code that may trigger a run-time error, whereas the except block contains code that handles errors of the sort. (the finally block contains code that runs irregardless of the outcome)

The authentication details have been hidden for security reasons. (REMEMBER TO NEVER DISCLOSE ANY OF THE FOUR TOKENS, THESE ARE USED TO GAIN ACCESS TO YOUR TWITTER ACCOUNT!)

Running and testing

It is common that code may not compile successfully on first try (much to your chagrin), do not take anything by it. Sift through the code for any potential silly mistakes (bear in mind that Python is case-sensitive, as are most other programming languages such as C# and Java. You will encounter a syntax error if there are any misspelled keywords), lack of/unexpected indentation and unclosed blocks of code among others) and press F5 to run again.

If no errors have been detected, you will first encounter ‘What’s on your mind?: ‘. Be sure not to leave the line empty otherwise you will cause a run-time error as shown below.
Evidence that invoke_error is indeed functional.

If all goes well, you should see the status on your Twitter page upon being notified that the status has been uploaded.

Stay tuned for more updates!

Phase #1: Lots and lots of research!

Researching about victims of SADS. Sudden death is incredibly common among athletes.

I am currently working on Cormac McAnallen, Ireland’s very first high profile case of SADS after finishing off Stephen Gately’s section. The process of researching is going smoothly, I plan to finish researching by next week. I may upload the Gantt chart, I have only until 10th June to work on this assignment.

Raising awareness about SADS in Malta

Sudden Arrhythmic Death Syndrome (often shortened to SADS, or otherwise known as Sudden Adult Death Syndrome) kills approximately 600 people between the age of 14 and 35 per annum in the United Kingdom. The victim usually dies in their sleep after the heart suddenly stops beating, this usually stems from an undetected heart defect which would be discovered post-mortem, usually caused by a fault in the electrical activity of the heart. There would be no prior symptoms, thus the reason why the death would be deemed untimely.

One of the most high profile cases of SADS would be the tragic death of Boyzone popstar Stephen Gately at the age of 33 while on holiday in Port d’Andratx, Mallorca in Spain. Initially, he was thought to have choked on his own vomit after having one drink too many. However, it turned out that his death was due to pulmonary oedema (excessive fluid in his lungs) from a congenital heart defect he had unknowingly inherited from his father. His family was provided with screening tests to check whether or not they were at risk of contracting the same illness that robbed the Irish popstar of his life prematurely, it was known that his older sister had inherited the condition as well back in 2012. According to younger brother Tony, a simple checkup could have saved Stephen’s life, all the more reason he urges the public to get tested.

I aim to use my assignment (designing and developing a responsive website) as a means of raising awareness about SADS in Malta as there is little to no awareness about such circumstances. I have recently launched a fundraiser in order to raise money for CRY (Cardiac Risk in the Young), so far €40 have been donated. All contributions go directly to said cause.

https://www.facebook.com/donate/340110076648965/

References:

Excerpt of Networking Security Vulnerabilities (from June 2018)

Security is never guaranteed when it comes to computer systems, much less for computer networks for they are always susceptible to numerous threats. Most threats may degrade the performance of the network or system, for instance it may behave erratically, and may even render it unstable. It can be rather cumbersome for users to look after the system and to ensure that it is free of malicious threats. The focal point is to outline two threats that may affect a network and to also prevent the aforementioned threats.

Little to no access levels may enable users to tamper with the resources present in the network. Moreover, high-privileged users may have the opportunity to take advantage of said data, hence causing chaos in the network. Therefore it is highly fundamental to set boundaries for each user in a network by setting the necessary access levels. For instance, one user may read a file but they cannot delete or modify it. Users may produce programs containing malicious code commonly known as malware, which can infect the computer. It is highly recommended to install and frequently update your anti-malware software and to scan external sources.

References

Cybrary. (2018). Top 10 Network Security Threats and Their Security Measures – Cybrary. [online] Available at: https://www.cybrary.it/0p3n/top-10-network-security-threats-security-measures/ [Accessed 3 Jun. 2018].

Howtogeek.com. (2018). Keep Your System Updated for Security and Stability. [online] Available at: https://www.howtogeek.com/school/windows-network-security/lesson8/ [Accessed 3 Jun. 2018].

Liquid Web. (2018). Why It’s Important to Keep Your Software Updated. [online] Available at:

https://www.liquidweb.com/blog/importance-updating-software-2/ [Accessed 3 Jun. 2018].

Saxe, M. (2018). 5 Reasons Why It’s Important To Update Your Software Regularly – Saxons Blog. [online] Saxons Blog. Available at: http://www.saxonsgroup.com.au/blog/tech/5-reasons-important-update-software-regularly/ [Accessed 3 Jun. 2018].

Design a site like this with WordPress.com
Get started